Showing posts with label sewing. Show all posts

Friday, March 25, 2016

Color Combos For Your Crafts, etc.


I found this really useful SITE to use for crafting, sewing, needlework, adult coloring, etc. or as the intended purpose - web site designing.

http://www.colorcombos.com/index.html

I've added it to my list of must see web sites located on the right side of my blog.


Friday, January 03, 2014

I've been MIA - Sorry...

In recent months I've kinda been neglecting my blog and shops while dealing with some medical issues.


Hopefully, for the new year that will change with regular posts and pics and the filling of merchandise in my two Etsy shops.  Re:  I NEED TO GET OFF MY BUTT AND DO SOME SEWING!


Saturday, June 01, 2013

I've Been Sewing Up A Storm Lately...

I got this idea off of Pinterest - at this blog. One change that I made was to cut a piece out of a cottage cheese carton top and put it on the bottom - the side that's up against my machine and then stuffed it with poly fil. Now, I won't be nicking my machine. I also just neatly attached my ribbon on the back of each side after my pincushion was done. Plus, I had to decorate mine with some cute, little buttons I'm obsessed with lately.

It's the handiest little thing I've made recently!!!


Friday, May 17, 2013

Handbag/Tote From A Pair Of Jeans

As Summer nears, the handbags and totes each made out of a pair of jeans start showing up here and there online. I found a really helpful 2 part, instructive youtube video to get ya started making one for yourself or to give as a gift.

Below is my version of a jeans handbag/tote. I found this cool pair of jeans with embroidery all down the outside of one leg, and I fell in love. I had to make something out of them. I also decided to make a key ring to match. I incorporated some of the embroidery as a large patch (and for a key ring) and did some decorative stitches here and there and added some buttons.

The flower cart pin is one that I wore quite often when I used to have to dress-up for my job. The manufactured, silver key ring on the back loop says - Live, Laugh, Love. I always loved that phrase. The small, off white hankie tied to the same belt loop was also something that I wore quite often tucked into a suit jacket.

Tuesday, May 14, 2013

Pocket Potholder Reading Glasses Case

Make a padded eye glasses case with a pocket for your cleaning cloth using a potholder. I dug one out of my kitchen drawer.  Please excuse the fact that it's a bit yellowed in spots.

This is a really handy, quick and easy hand sewing project for your reading glasses or to give as a gift.

Take a pocket potholder and fold into thirds with the pocket at the back. Neatly hand stitch the sides shut and stitch on a proper sized button to close using the potholder's hanging loop.

Put in your reading glasses and keep a microfiber cleaning cloth handy in the pocket.

Thursday, August 02, 2012

Paperback Book Covers

I saw THIS paperback book cover on Etsy last week and loved the design so much I bought it from Kim's shop. I love listening to audio books, but lately I've been reading to fall asleep faster.

I was going to make one myself, but really liked her unique design so I just bought one of hers. Then, I thought about all the different paperback book sizes there are now (when did that happen?) and decided to look for a free pattern online and make one too. But, I couldn't stop at one and made three! - one is for a hardcover book.


It was fun looking through my fabric stash and coordinating fabric choices. I found the free pdf pattern to download HERE. And of course I made a few changes to it.

1. I didn't quilt mine. I used a heavy fleece as the "batting" (padding) instead and it worked great.

2. I top stitched all three of mine once I'd finished them for a neater look. You must check first though to see if your book will fit after you do that. You may decide not to do it or change how far you stitch in.

3. I turned in the tail of the bookmark and stitched it shut so there wouldn't be a raw edge.

4. And, I basted, basted, basted. Since you are pinning so much together before you stitch around the whole book holder, I basted everything together first. I did it piece by piece, building up the layers and then basted all those layers together before the final stitching. I don't see it as that much extra work to be able to sew fast and stress-free knowing it'll all look great when it's turned right side out.

5. After I used pinking shears on the long sides of the lining I did turn the edges under slightly and top stitched.

I hope all that makes sense. After reading my changes and editing them several times for clarity, I know why I hate writing out my own patterns for others to follow.

Saturday, May 12, 2012

Fabric Felt Jewelry Box

I found THIS great idea/tutorial and made these two Fabric Felt Jewelry Boxes. Aren't they darling? Actually, you can use them for anything, but a pretty place to put my jewelry when I take it off works for me. I found the floral fabric at Walmart on clearance for $1.50 a yard. I have enough left to make a pillow or two.


Thursday, April 26, 2012

Let's visit the pillowcase tote again.

Are you tired of me making and blogging about These yet?

Please indulge me one more time (and maybe yet another time soon)...I found this beautiful, vintage pillowcase in a shop at Etsy and knew I wanted to buy it for a pillowcase tote. When I received it in the mail it is was kinda thin from a lot of use and washing I guess, but I decided to make a tote out of it anyway. I'd been tempted to buy it in the first place because of how it was constructed knowing the edge print would make cool, accent handles. I found the pin-on flower accent for only a dollar at a JoAnn new store opening.


I should write a book or at least a small article on how to fix or what to do with things that you screw-up or things you think you've ruined 'cause I think I've become an expert at it. For me, maybe that's what "my creative talent" is mostly rather than dreaming up things to make. The arrow points to what I finally came up with after I accidentally cut my almost finished tote bag with my SUPER sharp sewing scissors. :o( I tried to make it look kinda like a logo or something.


Saturday, April 14, 2012

Practical Decorating

Hubby and I live in an old house that has two open doorways with no doors so needless to say there is no privacy and when company is coming you can't just close a door to a mess - you have to straighten/clean up that room too.

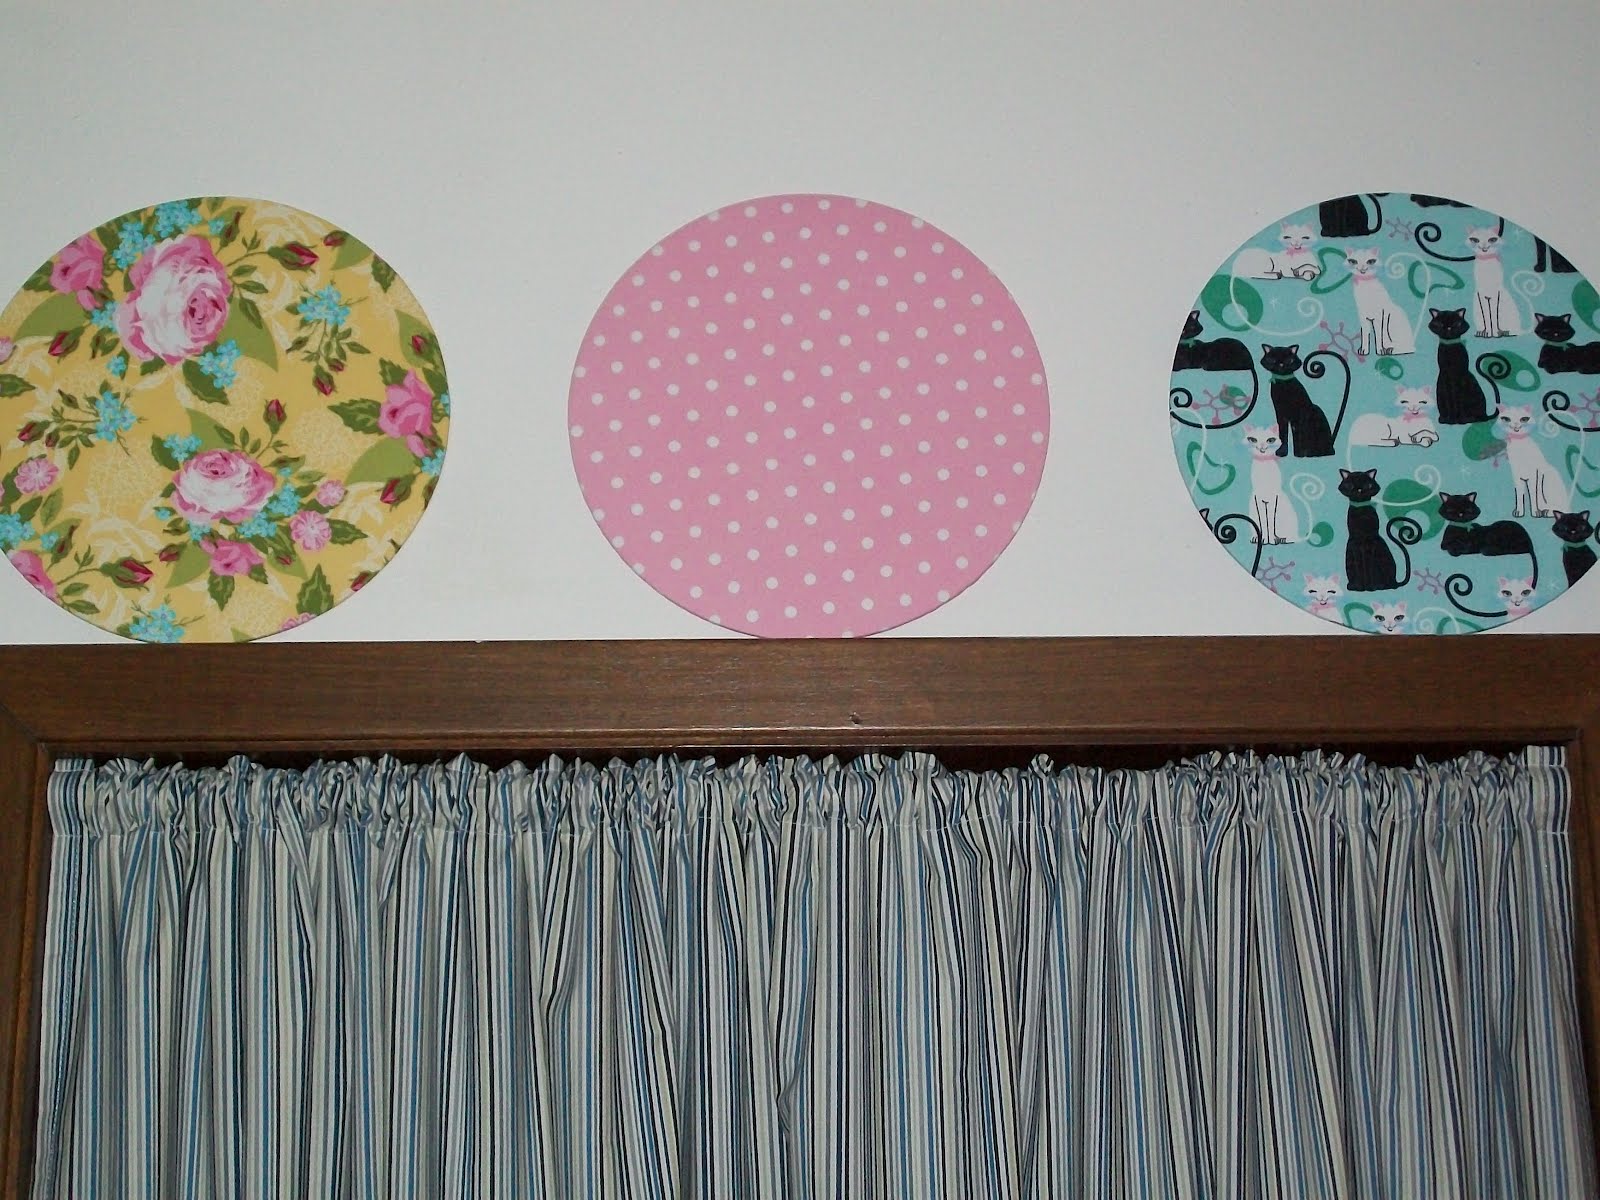
So, when I saw THIS idea on the web recently - covering cardboard Wilton cake circles with fabric and displaying them over a doorway, etc. I also thought of spring action curtain rods that I could use in the two doorway openings. At least it's a colorful and practical solution for now.


One doorway is off the living room and leads into my office/multipurpose room where I work on my Etsy shops and take photos for the items I make and list for sale. My constant shadow, Chico, sleeps in this room while I work and so does our most recent rescued cat, Twilight. The other doorway is off the dining room and leads to a small hallway and right to the bathroom door. Both are what I guess you could say are on the same side of the inner rooms (living room and dining room) if that makes sense so I wanted the gathered curtain panels to match.

I used basic, blue striped, full size sheets that I found at Walmart and fat quarters I also found there for most of the circles. The cat, roses and pink themed set of circles are just to the left of my mini sewing center HERE that I set-up in a small corner in our living room .

I sew there in the living room corner much more than I do in my smallish craft/sewing studio


that was used by the previous owner as the baby's room. It was once what they now call a man cave that I fixed up for hubby - a place where he could go, shut the door, sit in the recliner and watch TV shows and movies on DVDs, listen to music or play his guitar. But, when I started my Etsy shops and needed a quiet place to unwind from the stress of the day and work he told me I could have it as my room instead. What a super cool thing for him to give up for me!

Click on the above photo and check out my collection of 2 vintage doll houses, a pet shop and a pet salon (all from the same series/town) on the top shelf! - Love , love, love them all. All are complete with furniture, dolls, pets for pampering, hired help and pets for sale.

One of these days I need to take them all down, set them up and take photos!

Pillowcase Totes Revisited

This is the, well I've lost count, newest pillowcase tote that I've made.

Once again, I found the inspiration HERE.

I found this beautiful, vintage KING size pillowcase from an Etsy seller. I added one of my Fabric Roses and also did some decorative stitching around the top of the opening with my machine - A vine decorative stitch.

In this tote I also added a cardboard bottom covered in contrasting fabric.

This is my fav now. It will not be used for grocery shopping. :o)

Saturday, March 31, 2012

Vintage Travel Trailer Mug Rug

Awhile back I purchased a bag of fabric scraps from a gal at Etsy, and I was thrilled to find among all the cute fabric pieces this one, small piece printed with a vintage travel trailer!


Hubby and I are dreaming and hoping to buy one in the future and do some traveling. I've held on to this piece wondering what I could possibly make for myself since it was such a small remnant.

Then, it came to me - It would be perfect for a quilted mug mat or coaster! The scrap on the right above I used for the back. I love it! When I showed hubby my creation, he said when we get our trailer I could use it in it. :o)

Thursday, March 01, 2012

Pillowcase Grocery Tote

After dealing with other reuseable grocery totes that I really didn't like, I decided on one that I would like. I wanted one that was easy to throw in the washer and dryer and would come out looking good, didn't collect lint, cat and dog hair and one that I could make.

I found the free tutorial that I liked HERE. She uses every single inch of the pillowcase and what she cuts off, with no waste.

I have the match to make to this one and another pillowcase waiting in the wing to be stitched up too. When not in use, I will store them in the little fabric bag that the two pillowcases came in when I bought them at Walmart. I knew that little bag would come in handy for something.

Didn't the tote come out cute? I can also see it with a fabric rose pin attached and used for other things.

Another version of a pillowcase tote is HERE.


Saturday, February 18, 2012

NEW - Fabric Rose Brooches/ Pins

To celebrate the coming of Spring, I've been making and adding these little, fabric rose brooches/pins to my Etsy shop - Sew Art It Is By Kitty Red and I can't stop making them. I've listed 4 and have 4 ready to hand stitch and then list. Two of the new ones that I hope to list in a day or two will be in honor of St. Patrick's Day.


This black and white rose pin was included in a Treasury at Etsy.

Friday, December 10, 2010

Couple Of Projects Finished

I just finished a crocheted baby blanket for my second grandson and an "I Spy" toy/game for his older brother - A birthday present.


I just winged the "I Spy" toy after researching what others looked like selling at Etsy.com. I made my own pattern, added some new ideas of my own like a carrying strap, etc. I did pretty much copy the saying word for word though I think from someone, but I won't be selling any so I don't see the harm. In fact, this one will probably be my one and only. I think mine came out really well. I was so happy with it.


Saturday, November 06, 2010

T-Shirt Totes

I ran across THIS YouTube video yesterday and decided to rid my closet of a couple of t-shirts I never wear, but still like. I did, however, cut out my sleeves and neck carefully and jazzed them both up a bit too. I also used a zig-zag stitch rather than a staight stitch. I doubt I'll use mine to haul groc. in. I plan on using mine to tote my junk from one place to another. That is except my library books. I'm sure they both would hold them as I stitched the bottom twice, but the books would probably stretch the totes all out of shape.

Thursday, August 26, 2010

New Grandbaby Due In September

Front

Back

Click both photos to enlarge.....

I just finished this Baby Tag Blankie for my new grandson due in September. It's a small blankie with a variety of colors, patterns, and textures for the eyes, touch and to play with.

I used a pattern from a Quick Cuts leaflet and Quick Cuts 5 piece Fat Quarter Flannel Bundle both purchased at Walmart. The various ribbon pieces came from my ribbon remnant jar.

I changed the pattern a bit - adding zig-zag decorative stitching accenting the patchwork front, 2 rows of top stitching around the whole piece for super baby safety holding all ribbons securely and a hang tag/grab and tote tag.

Oh, and I used bias tape and some craft thread to create a made by tag that I then machine stitched onto the blankie.

Monday, January 25, 2010

Sewing Jar Pincushion


I've been wanting to make one of these sewing jars for years.

I made this prototype tonight. I have a whole box of these canning jars that I think I bought to store homemade yogurt in, but never used them. I'm not sure I'll make anymore of these, but if I did, for my shop, I'd think of a better way to finish off the inside of the cap. I just popped in a circle of scrapbooking paperboard with the look of old lettering on it.

Sometimes I go wild with something and make many and other times I just make a prototype and keep it for myself and move on to something else. I'm not sure how others make them, but I cut a styrofoam ball in half to use as the pincushion top. I love hot glue...It makes crafting SO easy.

Tuesday, January 19, 2010

A 2nd Sewing Center

I created a little sewing corner in the living room using and old, small computer desk. I'm flowing out of the little bedroom I made into a crafting studio. My mom's old sewing machine is still in there. You can see it in my blog banner.

I just finished putting up a cafe curtain rod for the skirt I made that hides many a boxes behind it. I found the cotton fabric at Walmart a couple of years ago. It saying "Creative Woman" on it and has some really cute graphics. The desk has a little pull-out table under the sewing machine where the keyboard sat where I keep a sewing book or two and notes.

There's a pink KK knitting loom missing from the wall 'cause I'm using it right now to make this. Now, what do I do with all the wood knitting boards that I have...


Monday, January 11, 2010

Oh, The Possibilities...


I've been playing around with this Gator Neck Warmer pattern. So far I've made one Gator Neck Warmer, a couple of head/ear warmers, a wrist/arm warmer tube, and now this cowl neck warmer.

Start with a piece of fabric that measures 19" x 40" instead of the 20" x 20". Stitch it like the pattern (note stretch direction) and you get this cowl neck warmer (much more forgiving of your hair style) The neck warmer/scarf this size also has a lot of styling possibilities.

Start with the same 19" x 40" fabric piece and stitch it with the stretch running the opposite direction of the pattern and you have a wrist/arm warmer tube (a long open tube). I made hubby a wrist/arm warmer tube in the football pattern to use while watching TV. His hands always get cold. I need to take a pic of it too I guess. It matches his football pattern head/ear warmer.

I started out with 2 different fleece fabrics - 1/2 yard each - $2.44 for 1/2 yard and each made 2 items. I had NO waste... Not bad...

Saturday, January 09, 2010

A Bit Of Sewing & Chatting

I did some sewing this weekend - simple projects for us and for one of my shops. It was a good way to get myself familiar with my new sewing machine. Learning how to thread the machine and the bobbin (and remembering it) are always a pain until you get it right. If it's not just right the machine won't work.

Some Gator Neck and Head Warmers (one for me and two for hubby's B-day) The pattern is here. The football print and winter print are a bit smaller and are for the head.


And, some cute tissue cozies - A new pattern for me that I reworked. I used some REALLY cute fabric inside and out.


A couple of Valentine tissue cozies...


On another note, I keep forgetting to fed my blog pet Ladybug. She HAS to be fed and watered at least once every 24 hours. One of these days FooPets.com is going to come get her if I don't get on the ball. Then, I'll have to pay to get her back - Seriously...

Our 2 kitties - Twilight Kitty and Angel Blue

I had to start calling Twilight, Twilight Kitty 'cause she knew the word kitty and would respond to that, but not her new name. So, by putting the two together I think she finally gets it that her name is Twilight after 2 months.